Difference between revisions of "Standalone Web SA NA"
| Line 8: | Line 8: | ||
* Windows 8 | * Windows 8 | ||
* Windows 8.1 | * Windows 8.1 | ||
| + | |||
=Web SA Prerequisites= | =Web SA Prerequisites= | ||
| Line 17: | Line 18: | ||
1) Microsoft .NET Framework 4 Client Profile | 1) Microsoft .NET Framework 4 Client Profile | ||
| − | * [http://www.microsoft.com/download/details.aspx?id=24872 http://www.microsoft.com/download/details.aspx?id=24872] | + | *[http://www.microsoft.com/download/details.aspx?id=24872 http://www.microsoft.com/download/details.aspx?id=24872] |
2) Microsoft .NET Framework 4 Extended | 2) Microsoft .NET Framework 4 Extended | ||
| − | * [http://www.microsoft.com/download/details.aspx?id=17718 http://www.microsoft.com/download/details.aspx?id=17718] | + | *[http://www.microsoft.com/download/details.aspx?id=17718 http://www.microsoft.com/download/details.aspx?id=17718] |
Any critical updates to these prerequisites should be installed via Windows Update. | Any critical updates to these prerequisites should be installed via Windows Update. | ||
| Line 30: | Line 31: | ||
To support the prerequisites for Web SA, the following system requirements must be met: | To support the prerequisites for Web SA, the following system requirements must be met: | ||
| − | * '''Processor''': 600 megahertz (MHz) Pentium III compatible or faster processor - 1 gigahertz (GHz) or faster is recommended | + | *'''Processor''': 600 megahertz (MHz) Pentium III compatible or faster processor - 1 gigahertz (GHz) or faster is recommended |
| − | * '''RAM''': 2GB of System Memory | + | *'''RAM''': 2GB of System Memory |
| − | * '''Hard Disk''': Up to 2GB of available space may be required. | + | *'''Hard Disk''': Up to 2GB of available space may be required. |
| + | *'''CD or DVD Drive''': Not required | ||
| + | *'''Display''': 1024 x 768 high color, 32-bit (Recommended) | ||
''Note: Standalone Web SA uses 500MB, additional hard disk space may be required for prerequisites.'' | ''Note: Standalone Web SA uses 500MB, additional hard disk space may be required for prerequisites.'' | ||
| − | |||
| − | |||
=Standalone Web SA Installation= | =Standalone Web SA Installation= | ||
| − | * Initiate the installation of the latest available release by downloading the executable file from [http://www.dsc.com/ www.dsc.com] or acquiring it from your dealer. | + | *Initiate the installation of the latest available release by downloading the executable file from [http://www.dsc.com/ www.dsc.com] or acquiring it from your dealer. |
| − | * Please select your Country: | + | *Please select your Country: |
<center>[[image:CountrySelection-2014-05-05_1018.png]]</center> | <center>[[image:CountrySelection-2014-05-05_1018.png]]</center> | ||
| − | * The End User License Agreement will be prompted: | + | *The End User License Agreement will be prompted: |
<center>[[image:LicenseAgreement-2014-05-05_1019.png]]</center> | <center>[[image:LicenseAgreement-2014-05-05_1019.png]]</center> | ||
| − | * If you agree, accept the agreement, click ‘Next’ and select your installation type: | + | *If you agree, accept the agreement, click ‘Next’ and select your installation type: |
<center>[[image:PackageSelection_StandaloneNA2014-05-05_1020.png]]</center> | <center>[[image:PackageSelection_StandaloneNA2014-05-05_1020.png]]</center> | ||
| Line 69: | Line 70: | ||
*The new short cuts are added in DSC folder under Start menu. | *The new short cuts are added in DSC folder under Start menu. | ||
| + | |||
=Standalone Web SA Activation= | =Standalone Web SA Activation= | ||
*To activate Standalone Web SA installation, go to Start Menu, All Programs, DSC folder and click ‘Activate Web SA (Standalone)’: | *To activate Standalone Web SA installation, go to Start Menu, All Programs, DSC folder and click ‘Activate Web SA (Standalone)’: | ||
| − | ** Windows 7: | + | **Windows 7: |
<center>[[image:StandaloneWebSA_Activation_StartMenu_Win7.png|183x197px]]</center> | <center>[[image:StandaloneWebSA_Activation_StartMenu_Win7.png|183x197px]]</center> | ||
| − | ** Windows 8+: | + | **Windows 8+: |
<center>[[image:StandaloneWebSA_Activation_StartMenu_Win8.png|140x206px]]</center> | <center>[[image:StandaloneWebSA_Activation_StartMenu_Win8.png|140x206px]]</center> | ||
| Line 107: | Line 109: | ||
*Windows 7: | *Windows 7: | ||
| − | [[image:StandaloneWebSA_Activation_StartMenu_Win7.png|183x197px]] | + | <center>[[image:StandaloneWebSA_Activation_StartMenu_Win7.png|183x197px]]</center> |
*Windows 8+: | *Windows 8+: | ||
| − | [[image:StandaloneWebSA_Activation_StartMenu_Win8.png|140x206px]] | + | <center>[[image:StandaloneWebSA_Activation_StartMenu_Win8.png|140x206px]]</center> |
| Line 143: | Line 145: | ||
Please note: Only one instance of standalone Web SA can run at a time. It could either run in native form or on the browser at a time. | Please note: Only one instance of standalone Web SA can run at a time. It could either run in native form or on the browser at a time. | ||
| + | |||
=Web SA Quick Startup= | =Web SA Quick Startup= | ||
| Line 220: | Line 223: | ||
====DLS Operators [[image:DLSOperator_TransparentIcon.png|35x32px]]==== | ====DLS Operators [[image:DLSOperator_TransparentIcon.png|35x32px]]==== | ||
| − | * Click ‘Administrator Tools’ tile. | + | *Click ‘Administrator Tools’ tile. |
| − | * Click ‘DLS Operators’ icon to manage Web SA operators: | + | *Click ‘DLS Operators’ icon to manage Web SA operators: |
<center>[[image:Admin_OperatorsPage_2014-05-05_1209.png|624x358px]]</center> | <center>[[image:Admin_OperatorsPage_2014-05-05_1209.png|624x358px]]</center> | ||
| Line 227: | Line 230: | ||
====Connection Settings [[image:ConnectionSettings_TransparentIcon.png|39x31px]]==== | ====Connection Settings [[image:ConnectionSettings_TransparentIcon.png|39x31px]]==== | ||
| − | * Click ‘Administrator Tools’ tile. | + | *Click ‘Administrator Tools’ tile. |
| − | * Click ‘Connection Settings’ icon to manage modem, pc-link and SMS connections: | + | *Click ‘Connection Settings’ icon to manage modem, pc-link and SMS connections: |
<center>[[image:ConnectionSettings_2014-05-05_1359.png|624x357px]]</center> | <center>[[image:ConnectionSettings_2014-05-05_1359.png|624x357px]]</center> | ||
| Line 234: | Line 237: | ||
====System Settings Configuration [[image:SystemSettings_TransparentIcon.png|39x31px]]==== | ====System Settings Configuration [[image:SystemSettings_TransparentIcon.png|39x31px]]==== | ||
| − | * Click ‘Administrator Tools’ tile. | + | *Click ‘Administrator Tools’ tile. |
| − | * Click ‘System Settings’ icon and create your own business card which will be displayed on home page and/or import your company logo in Web SA. If you have any accounts using ‘SMS’ connection type then you need to insert your Web SA machine public IP and port number here as well. | + | *Click ‘System Settings’ icon and create your own business card which will be displayed on home page and/or import your company logo in Web SA. If you have any accounts using ‘SMS’ connection type then you need to insert your Web SA machine public IP and port number here as well. |
<center>[[image:SystemSettings_2014-05-05_1213.png|624x458px]]</center> | <center>[[image:SystemSettings_2014-05-05_1213.png|624x458px]]</center> | ||
| Line 241: | Line 244: | ||
====Web SA Updates [[image:UpdateNotification_TransparentIcon.png|32x32px]]==== | ====Web SA Updates [[image:UpdateNotification_TransparentIcon.png|32x32px]]==== | ||
| − | * Click ‘Administrator Tools’ tile. | + | *Click ‘Administrator Tools’ tile. |
| − | * Click ‘Updates’ icon to view the latest updates available and how to install them. | + | *Click ‘Updates’ icon to view the latest updates available and how to install them. |
<center>[[image:UpdatesPage_2014-05-05_1214.png|624x458px]]</center> | <center>[[image:UpdatesPage_2014-05-05_1214.png|624x458px]]</center> | ||
| + | |||
=Create an Account and Connect to System= | =Create an Account and Connect to System= | ||
| Line 279: | Line 283: | ||
<center>[[image:WebSA_MainToolBar.png|426x70px]]</center> | <center>[[image:WebSA_MainToolBar.png|426x70px]]</center> | ||
| + | |||
=Dashboard [[image:Dashboard_TransparentIcon.png]]= | =Dashboard [[image:Dashboard_TransparentIcon.png]]= | ||
| Line 294: | Line 299: | ||
<center>[[image:Dashboard(2)_2014-05-05_1241.png|624x357px]]</center> | <center>[[image:Dashboard(2)_2014-05-05_1241.png|624x357px]]</center> | ||
| + | |||
=User Management [[image:Users_TransparentIcon.png]]= | =User Management [[image:Users_TransparentIcon.png]]= | ||
| Line 301: | Line 307: | ||
<center>[[image:Users_2014-05-05_1251.png|624x357px]]</center> | <center>[[image:Users_2014-05-05_1251.png|624x357px]]</center> | ||
| + | |||
=Schedule Management [[image:Schedule_TransparentIcon.png]]= | =Schedule Management [[image:Schedule_TransparentIcon.png]]= | ||
| Line 314: | Line 321: | ||
<center>[[image:Schedules(2)_2014-05-05_1253.png|624x357px]]</center> | <center>[[image:Schedules(2)_2014-05-05_1253.png|624x357px]]</center> | ||
| + | |||
=Event Buffer [[image:EventBuffer-TransparentIcon.png|48x38px]]= | =Event Buffer [[image:EventBuffer-TransparentIcon.png|48x38px]]= | ||
| Line 322: | Line 330: | ||
<center>[[image:EventBuffer_2014-05-05_1254.png|624x357px]]</center> | <center>[[image:EventBuffer_2014-05-05_1254.png|624x357px]]</center> | ||
| + | |||
=Reports [[image:Reports_TransparentIcon.png]]= | =Reports [[image:Reports_TransparentIcon.png]]= | ||
| Line 331: | Line 340: | ||
User Activity Report can be exported from Event Buffer section utilizing the available filters. | User Activity Report can be exported from Event Buffer section utilizing the available filters. | ||
| + | |||
=Reminder Information= | =Reminder Information= | ||
*When setting up an account to connect with hybrid system (Power Neo) using ‘IP’ connection type, make sure to change the port number to 3092. Web SA communicates to system using this port number. | *When setting up an account to connect with hybrid system (Power Neo) using ‘IP’ connection type, make sure to change the port number to 3092. Web SA communicates to system using this port number. | ||
| + | |||
=Engine Limitations= | =Engine Limitations= | ||
| Line 340: | Line 351: | ||
*If only one modem is used, it must be set for outgoing only | *If only one modem is used, it must be set for outgoing only | ||
*If modem is not connected directly to PC via a native RS-232 port then only Keyspan USB-to-Serial converter must be used to optimize the full PSTN functionality | *If modem is not connected directly to PC via a native RS-232 port then only Keyspan USB-to-Serial converter must be used to optimize the full PSTN functionality | ||
| + | |||
=Browser Limitation= | =Browser Limitation= | ||
*Firefox Browser: If login credentials are saved (Remember password is enable), you will not be able to login next time with saved credentials. This is a browser specific issue and not Web SA. Please view the Firefox article regarding this issue: [https://support.mozilla.org/en-US/kb/usernames-and-passwords-are-not-saved https://support.mozilla.org/en-US/kb/usernames-and-passwords-are-not-saved] | *Firefox Browser: If login credentials are saved (Remember password is enable), you will not be able to login next time with saved credentials. This is a browser specific issue and not Web SA. Please view the Firefox article regarding this issue: [https://support.mozilla.org/en-US/kb/usernames-and-passwords-are-not-saved https://support.mozilla.org/en-US/kb/usernames-and-passwords-are-not-saved] | ||
Revision as of 15:31, 8 May 2014
Contents
- 1 Supported Operating Systems
- 2 Web SA Prerequisites
- 3 Minimum PC Hardware Requirements
- 4 Standalone Web SA Installation
- 5 Standalone Web SA Activation
- 6 Launch Web SA & Default Login
- 7 Default Web SA application Login
- 8 Web SA Quick Startup
- 9 Create an Account and Connect to System
- 10 Dashboard
- 11 User Management
- 12 Schedule Management
- 13 Event Buffer
- 14 Reports
- 15 Reminder Information
- 16 Engine Limitations
- 17 Browser Limitation
Supported Operating Systems
- Windows XP Professional with Service Pack 3 or higher
- Windows XP Professional with Service Pack 2, Windows Installer 3.1, and KB926255 Windows Updates installed
- Windows Vista
- Windows 7
- Windows Server 2008 R2
- Windows 8
- Windows 8.1
Web SA Prerequisites
The following applications must be installed for DLS Workgroup Client to operate.
These prerequisites are automatically downloaded (if necessary) and installed under normal circumstances.
1) Microsoft .NET Framework 4 Client Profile
2) Microsoft .NET Framework 4 Extended
Any critical updates to these prerequisites should be installed via Windows Update.
Minimum PC Hardware Requirements
To support the prerequisites for Web SA, the following system requirements must be met:
- Processor: 600 megahertz (MHz) Pentium III compatible or faster processor - 1 gigahertz (GHz) or faster is recommended
- RAM: 2GB of System Memory
- Hard Disk: Up to 2GB of available space may be required.
- CD or DVD Drive: Not required
- Display: 1024 x 768 high color, 32-bit (Recommended)
Note: Standalone Web SA uses 500MB, additional hard disk space may be required for prerequisites.
Standalone Web SA Installation
- Initiate the installation of the latest available release by downloading the executable file from www.dsc.com or acquiring it from your dealer.
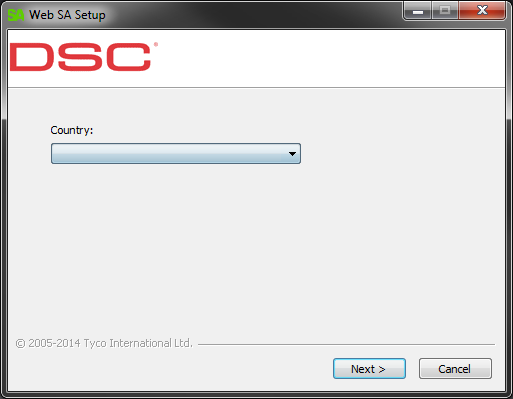
- Please select your Country:
- The End User License Agreement will be prompted:
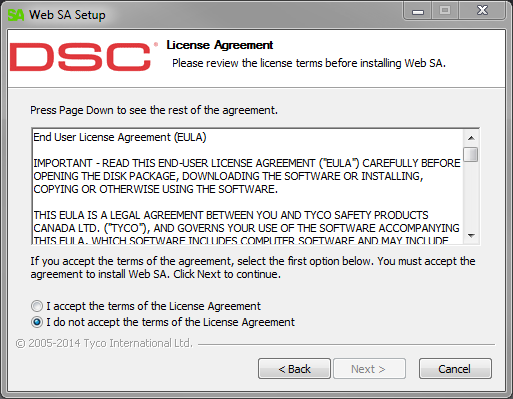
- If you agree, accept the agreement, click ‘Next’ and select your installation type:
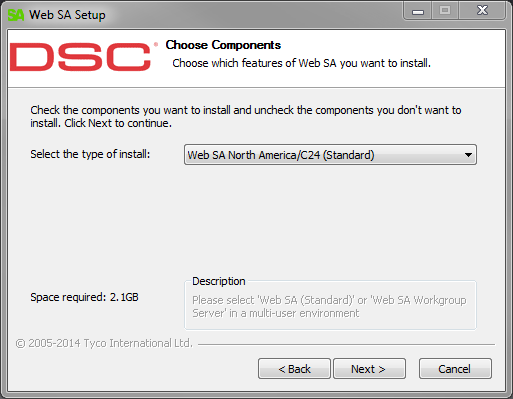
- If the selected installation package is not supported in your selected country, following error will be prompted:
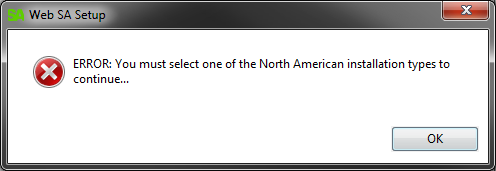
- When an international Web SA installation type is selected for North American countries:
- Web SA installation files will be installed in the following directory:
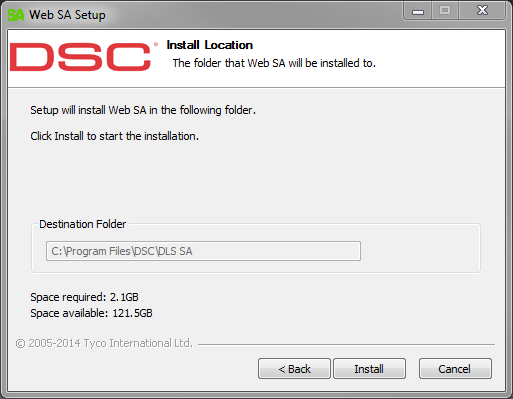
- Click ‘Install’. Web SA Installer will automatically search for .NET 4.0 Framework. If it is not installed, you will be requested by the installer utility to initiate the installation.
- Once the installation has completed, you will be prompted with installation confirmation and a link to Web SA help page:
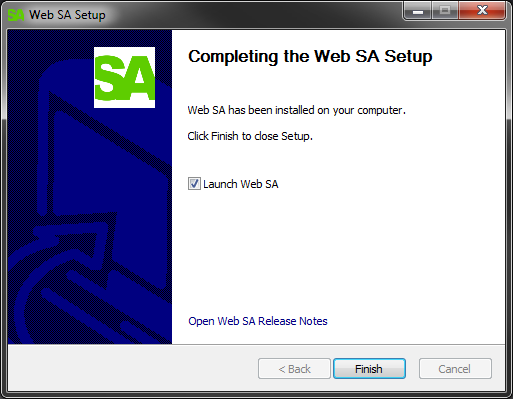
- The new short cuts are added in DSC folder under Start menu.
Standalone Web SA Activation
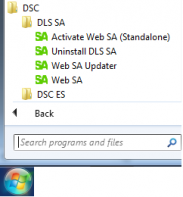
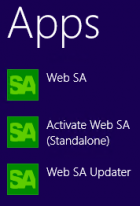
- To activate Standalone Web SA installation, go to Start Menu, All Programs, DSC folder and click ‘Activate Web SA (Standalone)’:
- Windows 7:
- Windows 8+:
Insert the activation key provided by your security company in the following prompted form:
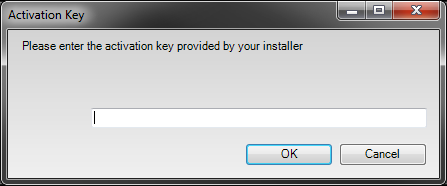
- A new activation key must be inserted for every new installation per machine.
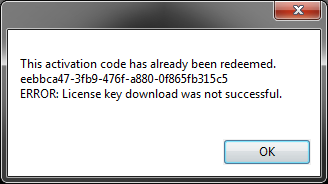
- Following error will be prompted if already redeemed activation key is used and license file will not be downloaded:
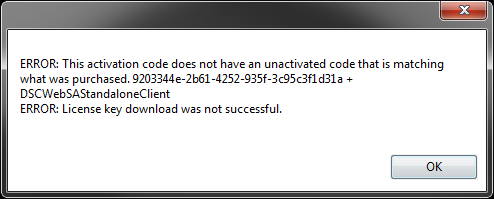
- Following error will be prompted if a wrong package activation key is inserted and license file will not be downloaded:
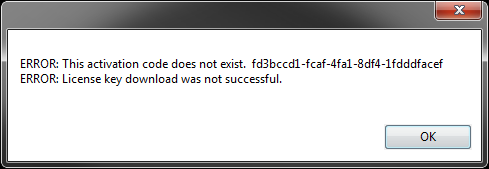
- Following error will be prompted if a wrong format or incomplete activation key is inserted:
- After inserting the correct activation key, license file will be automatically downloaded successfully:
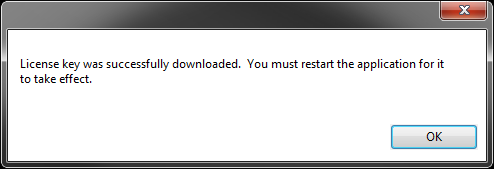
Launch Web SA & Default Login
To launch Standalone Web SA, click ‘Web SA’ shortcut on desktop or go to Start Menu, All Program, DSC Folder and click ‘Web SA’:
- Windows 7:

- Windows 8+:

Default Web SA application Login
|
Login: |
Sa administrator |
|
Password: |
1234 |
If forgot to activate the software, you will still be able to launch the application, try to login and will be notified instantly that license is not found, please activate the software:
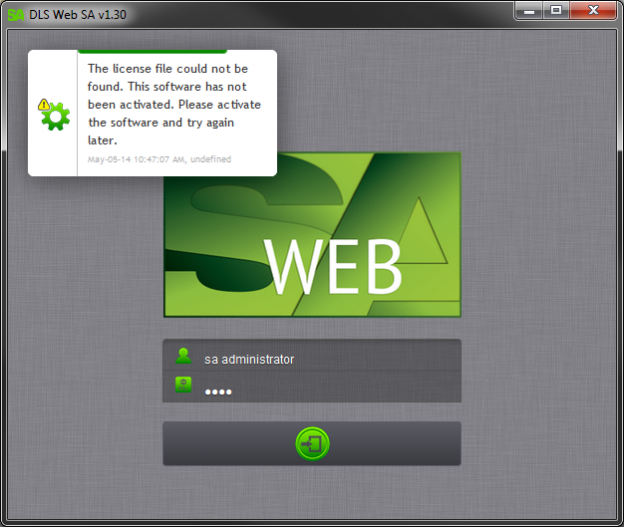
By default, Web SA application will be launched in Native Windows Form. You could also run standalone Web SA in the supported browser by right-clicking on Web SA native form and selecting “View in System Browser”:
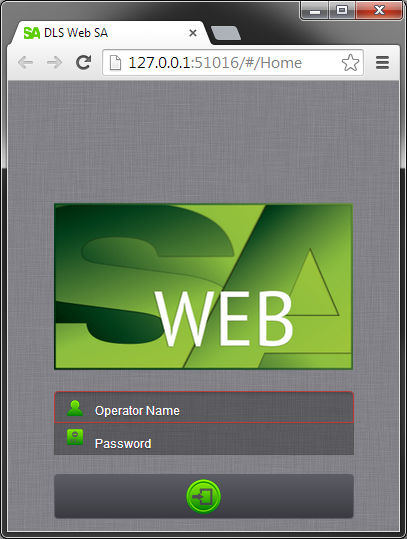
Please note: Only one instance of standalone Web SA can run at a time. It could either run in native form or on the browser at a time.
Web SA Quick Startup
Web SA Home page will be visible after successfully logging into the application:
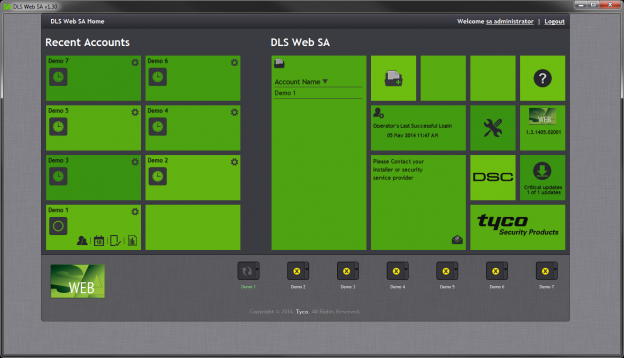
Recent Accounts
Any accounts created either from DLS or Web SA will be visible as a tile under this section. If an account initiates communication session with corresponding system, the connection status will be shown in real-time on lower right of application. When account will successfully connect with the system, you will be able to access specific account section within the tile:

DLS Web SA Tiles
Search Pane
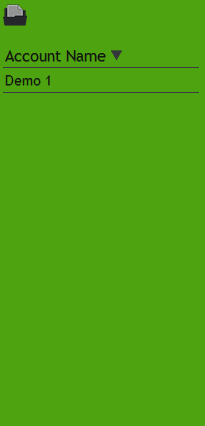
If more than 8 accounts exist, you can search for other accounts from search pane:
Web SA Help Link
You can access Web SA Wiki help page by clicking on following icon:

Last Login
This tile will show date & time of your last successful login:

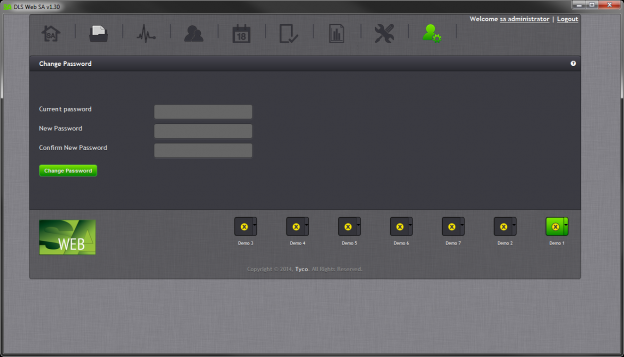
You can change your password by clicking on the ‘Change Password’ shortcut:
Administrator Tools
You would be able to access administrator specific functions by clicking on this tile if logged in as an SA Administrator or Facility Manager:

Business Card
Business Card tile will be visible to any level operator who will log into Web SA. By default, this tile will be empty:
SA Administrator or Facility manager can program their organization required information
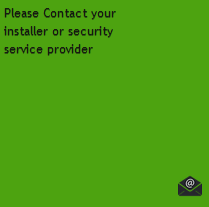
The desired content of this tile can be programmed from ‘Systems Settings’ page by SA Administrator or Facility Manager:

If local e-mail application is already configured on the machine then new e-mail window will prompt up by clicking on the e-mail icon within the tile:

If local e-mail application is not configured then Web SA Wiki page will be launched.
Web SA Release Number
Latest Web SA release number will be visible in this tile:

Web SA Update Notification
This tile will be visible if new updates are available for Web SA application:

Administrator Tools 
DLS Operators 
- Click ‘Administrator Tools’ tile.
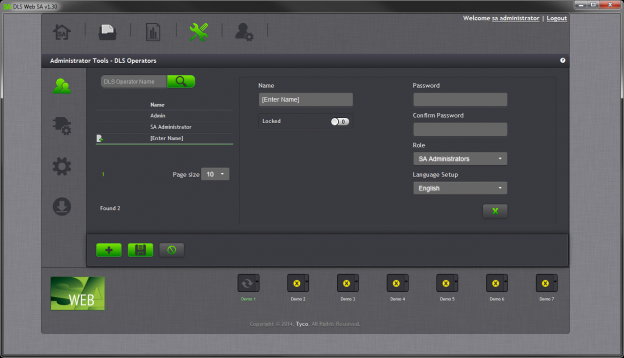
- Click ‘DLS Operators’ icon to manage Web SA operators:
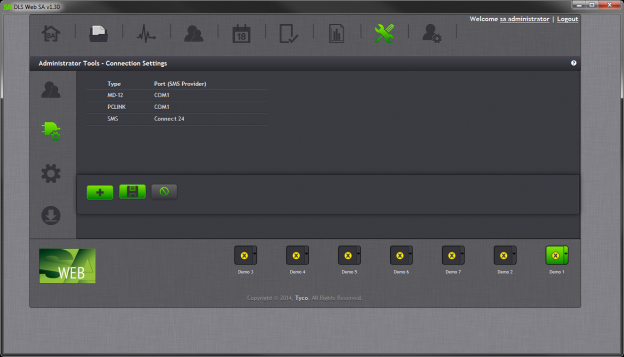
Connection Settings 
- Click ‘Administrator Tools’ tile.
- Click ‘Connection Settings’ icon to manage modem, pc-link and SMS connections:
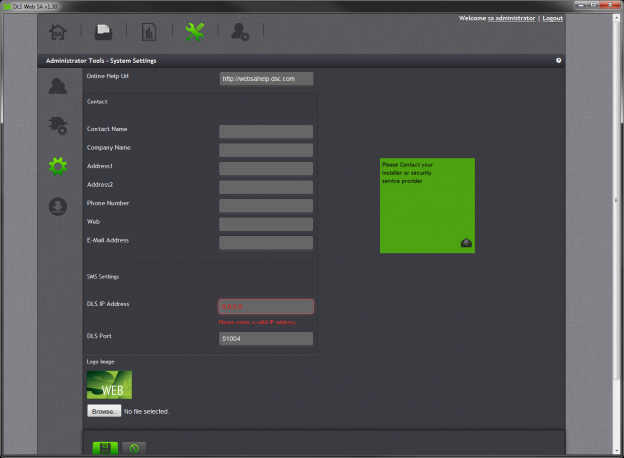
System Settings Configuration 
- Click ‘Administrator Tools’ tile.
- Click ‘System Settings’ icon and create your own business card which will be displayed on home page and/or import your company logo in Web SA. If you have any accounts using ‘SMS’ connection type then you need to insert your Web SA machine public IP and port number here as well.
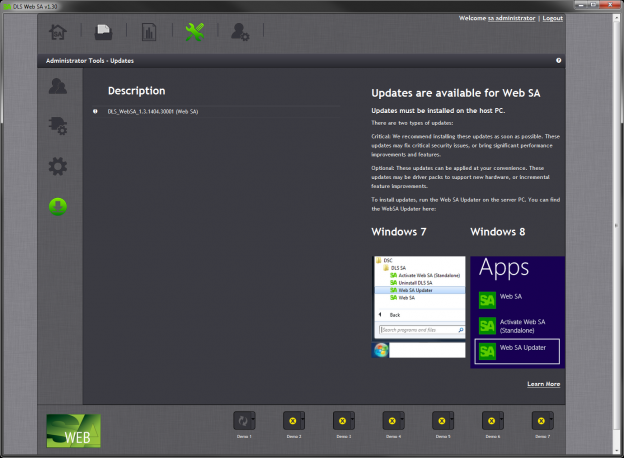
Web SA Updates 
- Click ‘Administrator Tools’ tile.
- Click ‘Updates’ icon to view the latest updates available and how to install them.
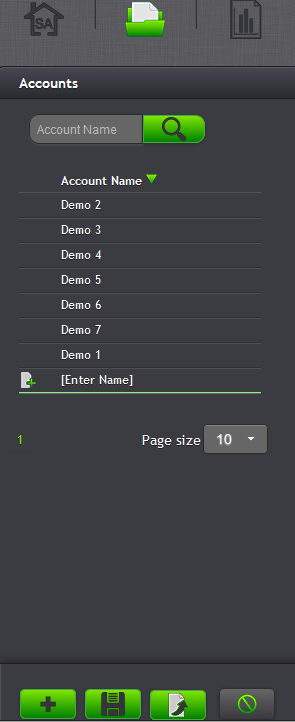
Create an Account and Connect to System
You can create a new account either from home page by clicking on the following icon:

Or from the accounts page by clicking ‘Add’:
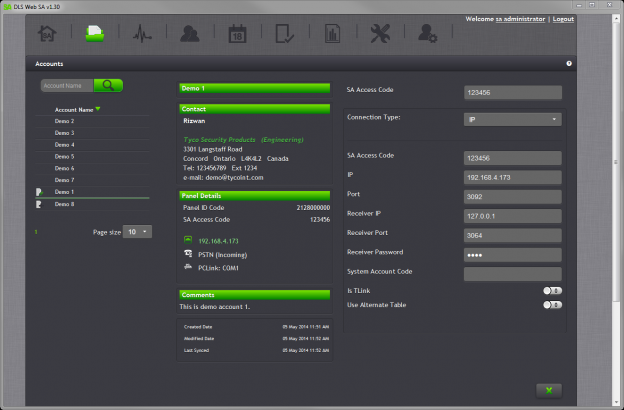
Insert the required information in the following sections when creating an account:
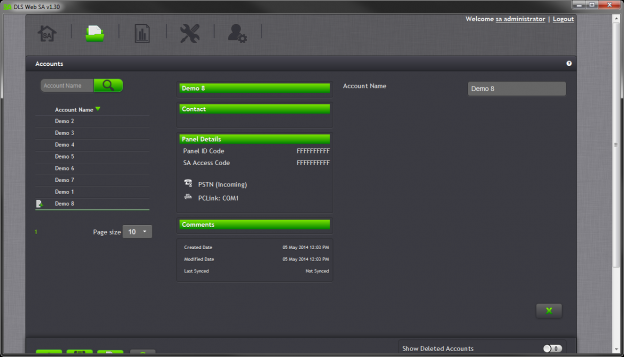
You need to click on section headings to fill the section specific information. Once all the information is inserted, click ‘Save’ icon:
When ‘Save’ is clicked, notification will be prompted indicating account is successfully saved.
Account will automatically initiate the communication session and once the system is successfully identified, following notification will be prompted:

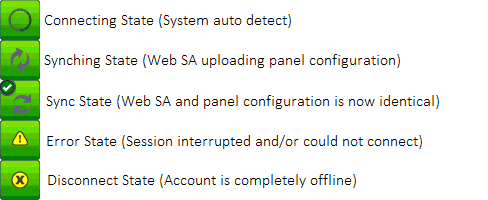
The initiation and connection state will be represented in real-time mode through interactive icons:
Once the account session is successfully established with the system, account specific tabs will be visible in the main menu bar:

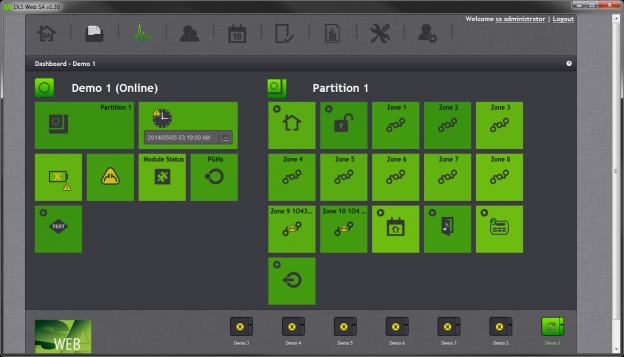
Dashboard 
- Click ‘Dashboard’ icon on main tool bar.
- Manage and view your security system statuses in real-time mode.
Real-Time System Status View:
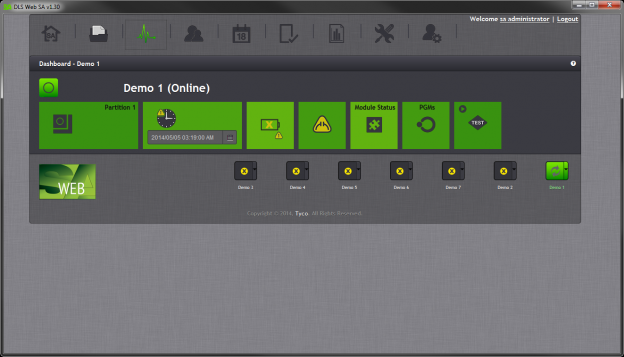
Partition specific real-time system status view with available functions:
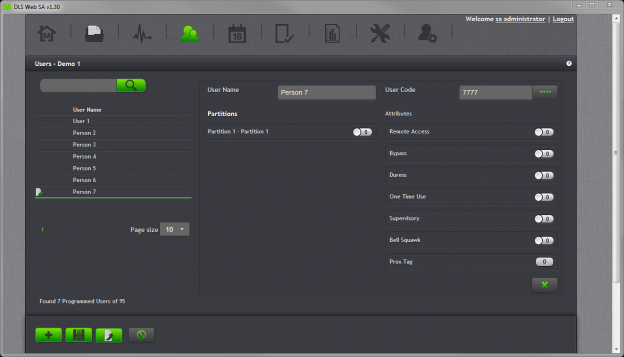
User Management 
- Click ‘Users’ icon on main tool bar.
- Manage panel users configuration:
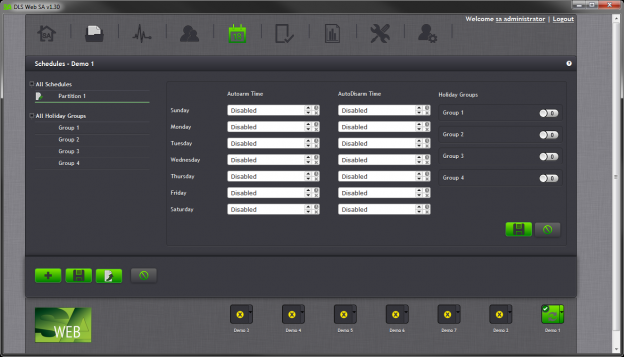
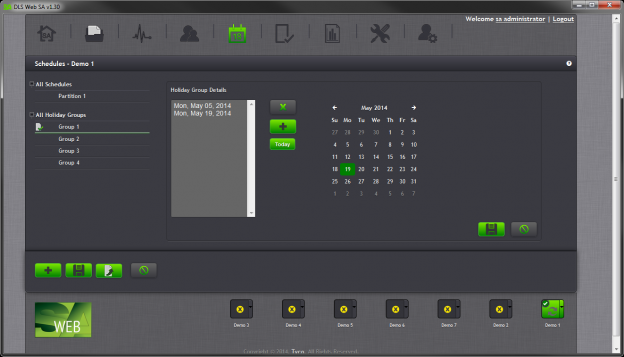
Schedule Management 
- Click ‘Schedules’ icon on main tool bar.
- Program Partitions holiday groups, auto arm/disarm schedules and its intervals in this section.
Manage Schedule(s)
Manage Holiday(s)
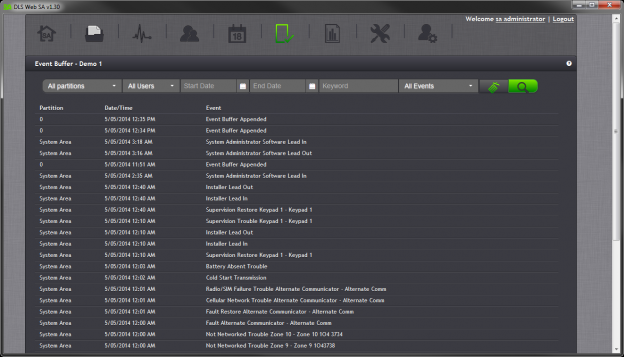
Event Buffer 
- Click ‘Event Buffer’ icon on main tool bar.
- Use available filters to filter out for specific data
- Filtered event logs can be exported both in XML and PDF format.
Reports 
- Click ‘Reports’ icon on main tool bar.
- Depending on operator permission, all the account specific reports can be exported either in XML or PDF format from this section:
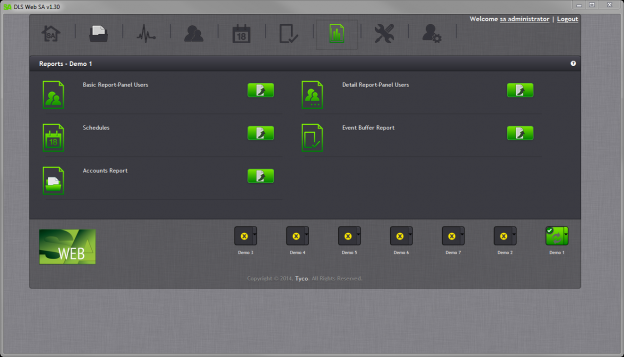
User Activity Report can be exported from Event Buffer section utilizing the available filters.
Reminder Information
- When setting up an account to connect with hybrid system (Power Neo) using ‘IP’ connection type, make sure to change the port number to 3092. Web SA communicates to system using this port number.
Engine Limitations
- If only one modem is used, it must be set for outgoing only
- If modem is not connected directly to PC via a native RS-232 port then only Keyspan USB-to-Serial converter must be used to optimize the full PSTN functionality
Browser Limitation
- Firefox Browser: If login credentials are saved (Remember password is enable), you will not be able to login next time with saved credentials. This is a browser specific issue and not Web SA. Please view the Firefox article regarding this issue: https://support.mozilla.org/en-US/kb/usernames-and-passwords-are-not-saved